Vehicle Wrap Engineering Masterclass: The Installer's Complete Guide
The thesis: thermal memory and surface chemistry
Most wrap failures are not material defects — they are physics and chemistry. When an installer understands thermal memory (the stored tension inside stretched vinyl) and surface chemistry (how pressure-sensitive adhesive bonds to a clean panel), roughly 90% of wrap failures disappear. This masterclass walks the full technical protocol, slide by slide, for installation managers, wrap technicians and quality-assurance inspectors.
Four pillars carry the whole discipline: the 195°F–212°F post-heating threshold that resets polymer memory, 100% aliphatic TPU chemistry that cannot yellow, a three-pass surface decontamination SOP, and razor-free knifeless trimming.
Film architecture: cast vs. calendered vinyl
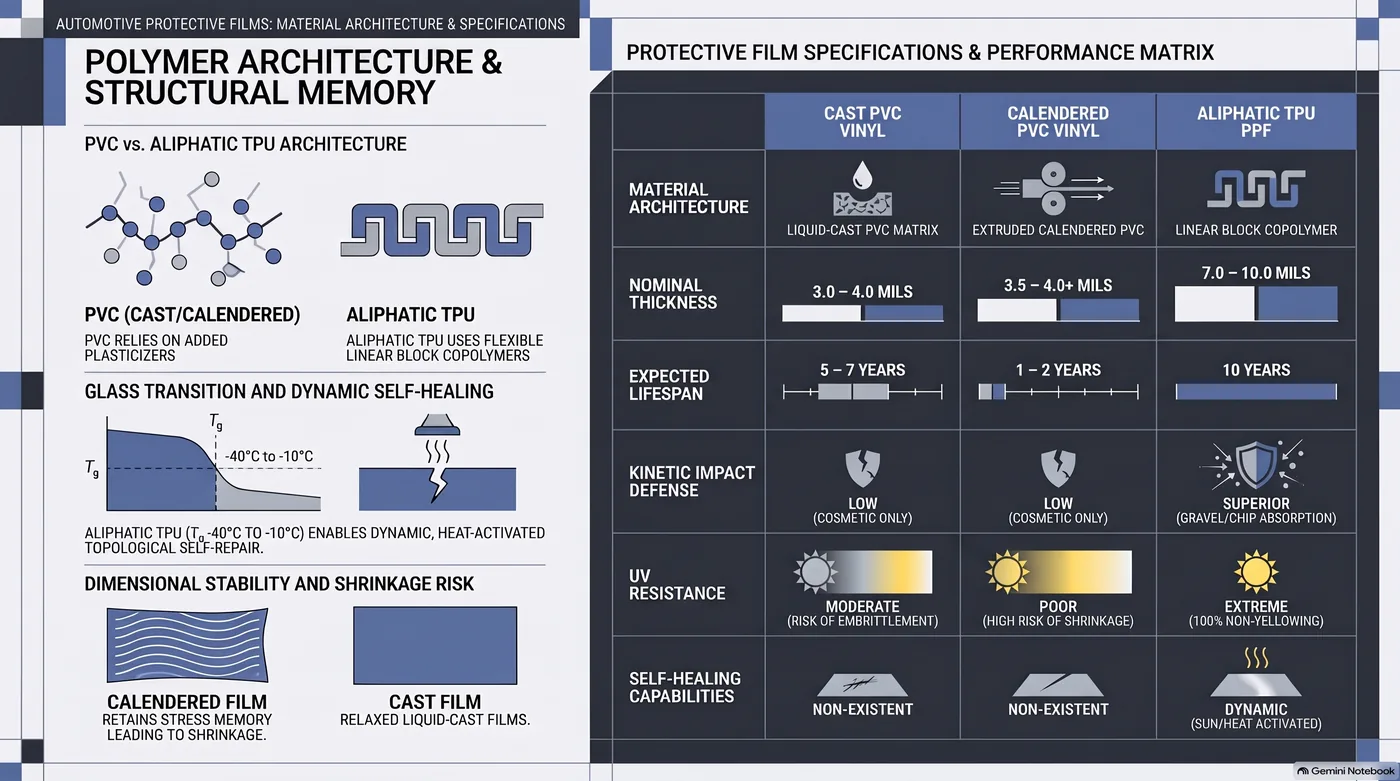
The manufacturing process decides how a film behaves for the rest of its life. Liquid-cast PVC is poured onto a casting sheet and baked with no mechanical stress, so it holds zero built-in tension in its flat state and has almost no natural shrink-back. That is why cast vinyl conforms over 3D compound curves, rivets and deep recesses, and lasts five to seven-plus years outdoors.
Calendered PVC is extruded through heavy heated rollers, which leaves high intrinsic memory — the sheet continuously tries to shrink back to its pre-rolled state. It is stiffer, builds high internal tension in deep recesses, and lasts one to three years before plasticizer migration, cracking and shrinkage appear. It belongs on flat panels, simple curves and short-term promotional graphics.
For the full thickness, lifespan and conformability comparison, see our cast vs. calendered vinyl guide.
Thermal dynamics: application heat vs. post-heat
Heating has two separate jobs. Application heat at 104°F–140°F (40°C–60°C) lowers the yield stress so vinyl can stretch over curves — it uncoils the polymer chains but leaves internal elastic tension intact. Post-heat at 195°F–212°F (90°C–100°C) is the memory reset: it permanently relieves viscoelastic strain in any area stretched beyond 10%.
One caution window matters. Heating 3M 2080 past 150°F (65°C) during the stretch clouds the gloss and distorts the texture. And skipping post-heat is the number-one cause of premature edge lifting within two to six months. Read the full post-heat science.
Post-heat temperature targets by film type
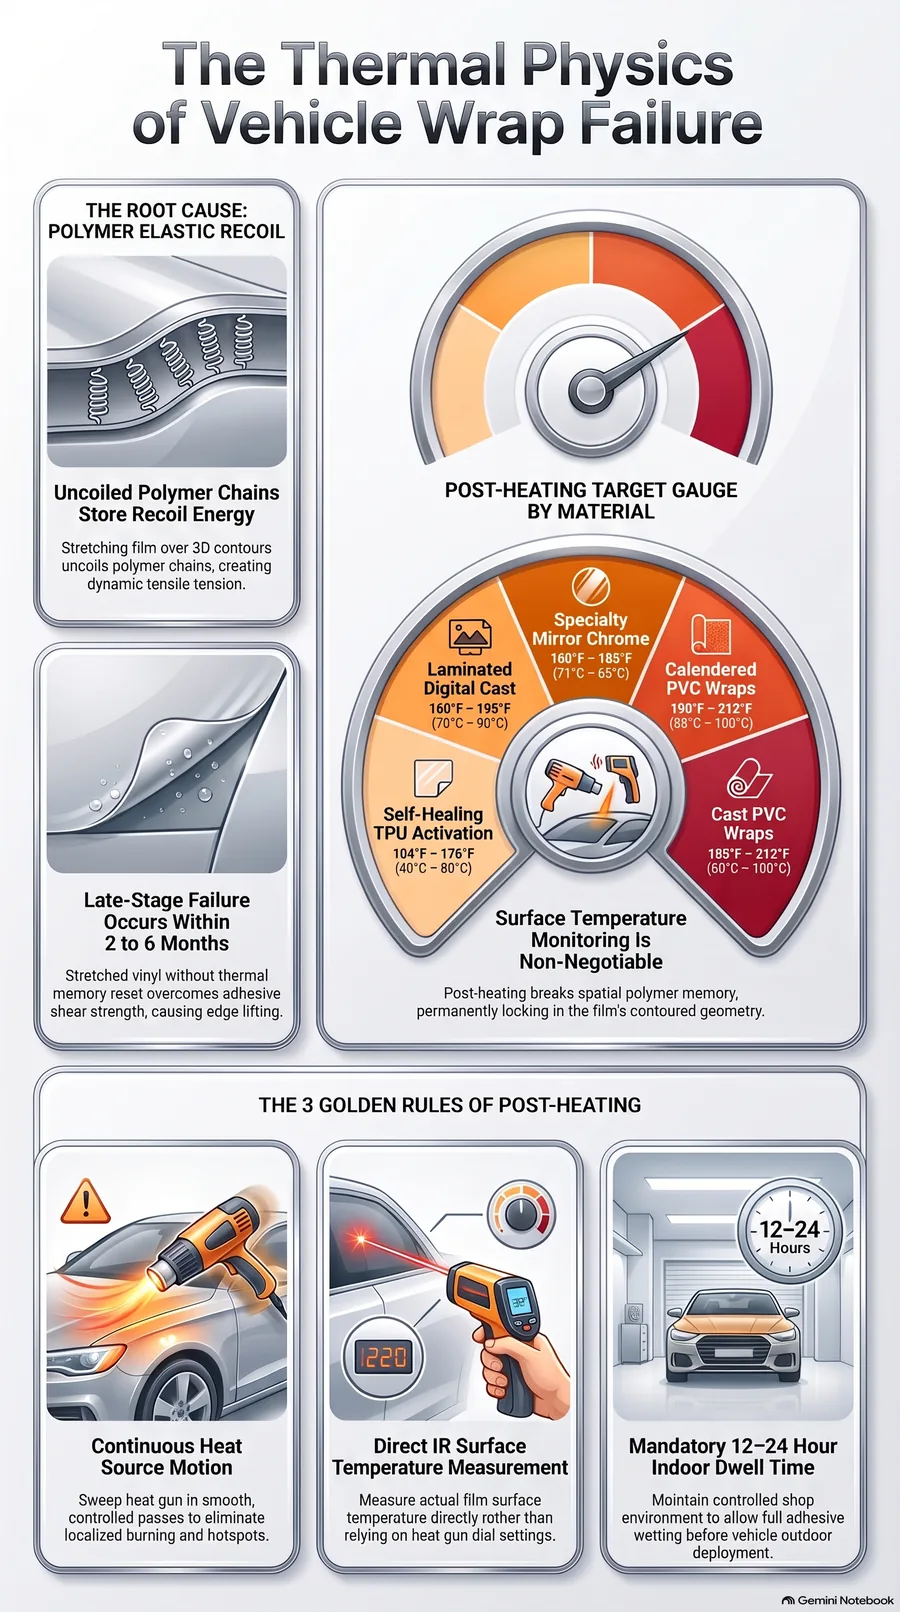
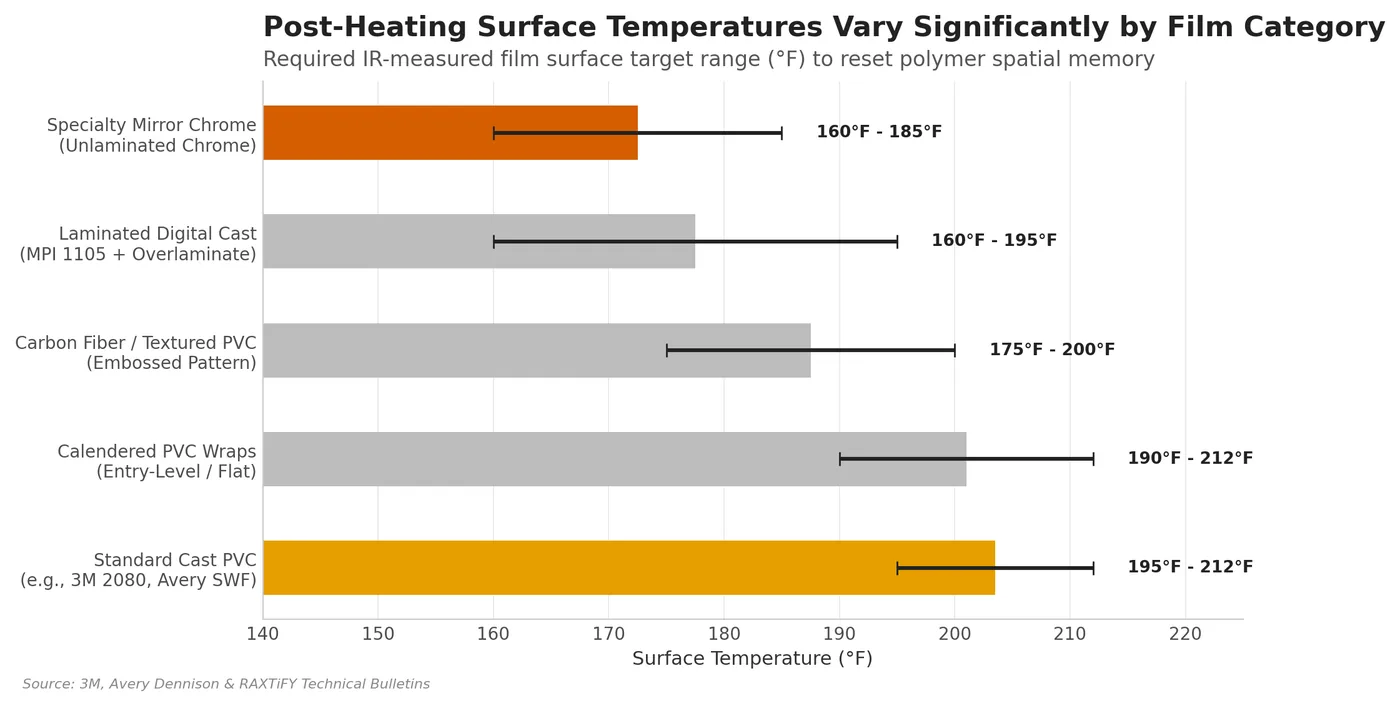
Different films reset at different temperatures, and the targets are not interchangeable. Cast color-change PVC needs 195°F–212°F (90°C–100°C) — 3M Series 2080 specifies a 201°F (94°C) minimum, Avery SWF 194°F–203°F. Calendered PVC runs 190°F–212°F (88°C–100°C) because its extruded roller tension needs a strict reset.
Laminated digital cast films stay lower — 160°F–195°F (70°C–90°C) — to stop the overlaminate delaminating or hazing. Specialty mirror chrome is the strictest: 160°F–185°F (71°C–85°C), and exceeding 185°F causes irreversible white clouding. Carbon fiber and textured films post-heat at 175°F–200°F (79°C–93°C) — overheating flattens the embossed pattern into glossy spots.
Three rules for accurate IR temperature readings
Never guess a surface temperature and never trust the heat gun's built-in display. Rule one: measure the film surface directly with a calibrated digital infrared (laser) thermometer. Rule two: move the hot air stream away from the spot before pulling the trigger — reading through active airflow skews the number higher than the real film temperature. Rule three: keep the heat gun moving constantly across stretched zones; a stationary gun scorches the topcoat or burns through the adhesive.
Four root causes of late-stage edge lifting
When a wrap lifts at the edges or pops out of a channel weeks later, one of four failures is usually behind it. Unrelieved elastic recoil — stretching past 10% without a full post-heat leaves stored tension that beats adhesive peel strength during thermal cycling. Surface contamination — residual wax, polish, road grease or ceramic coatings stop the adhesive from wetting out. Overstretching and bridging — forcing film into deep channels under tension instead of feeding it naturally creates instant pop-outs on cooling. Trapped moisture — applying film over damp seams or weatherstripping causes immediate edge lifting and adhesive breakdown.
Surface prep: the decontamination SOP
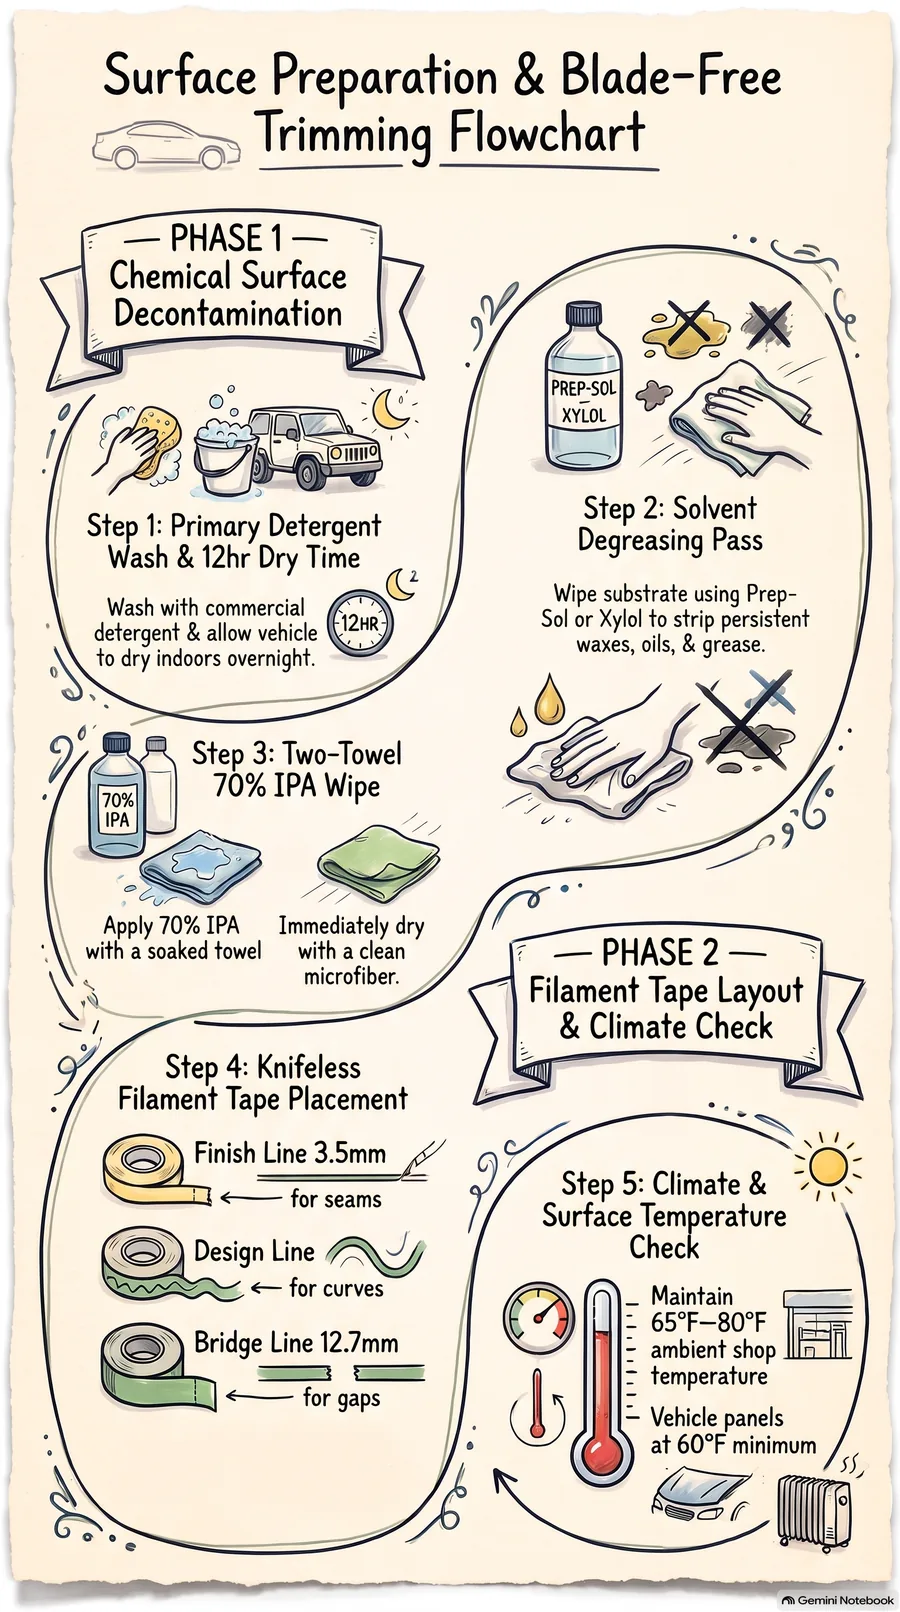
Adhesion is won or lost before the film goes on. The four-step protocol: first, wash with commercial detergent and water, drying overnight indoors if the vehicle sat in a wet bay. Second, solvent-degrease with Prep-Sol or Xylol to strip oil, grease, tar and hydrophobic wax or sealant residue. Third, the two-towel 70% isopropyl alcohol wipe. Fourth, dry every crevice — window rubbers, door gaps, emblem recesses and panel channels — with low heat or compressed air.
The two-towel method exists because 70% IPA gives enough dwell time to dissolve contaminants, where pure 99% IPA evaporates too fast. Towel one applies the IPA; towel two wipes it dry before the solvent evaporates, so dissolved oils leave the panel instead of re-settling.
Watch the solvent warnings too. Avoid direct IPA on polyurethane laminates such as DOL 6460 (it mats the surface). Never combine IPA and heat on 3M Gloss Silver Chrome (it hazes the finish). And flag repainted panels — uncured paint outgasses into bubbles, and non-OEM repaints risk lifting when the graphic is later removed.
Shop climate thresholds
The install bay is part of the tooling. Optimal ambient is 65°F–80°F (18°C–27°C) — above 85°F the adhesive pre-tacks aggressively, below 60°F the film turns brittle. Panel surfaces must reach at least 60°F (15°C) before application for the pressure-sensitive acrylic to tack. After install, the vehicle stays indoors in controlled shop temperature for 12–24 hours so the viscoelastic bond builds full strength.
Knifeless trimming: finish, design and bridge line
A utility blade over painted bodywork leaves microscopic scores that rust and peel the clear coat later. Knifeless filament tape cuts vinyl from underneath with zero blade contact. Three tapes cover the field: 3M Finish Line (3.5 mm) turns sharp cuts along body lines and panel returns, Design Line bends around tight radii and freeform art, and Bridge Line (12.7 mm) spans door-to-fender and trunk gaps for a centered parallel cut in one pull. Read the knifeless trimming guide.
ADAS sensors and overlap direction
Modern vehicles carry sensors the film must not cover. Trim around ultrasonic parking sensors to avoid false alerts, verify wrapped rear bumpers do not weaken blind-spot radar, and keep backup cameras, front grille radar domes and lidar windows clear. Test every safety system before delivery.
Seam direction matters just as much. Apply multi-panel graphics rear-to-front, lay vertical overlaps bottom-to-top so the upper panel laps the lower, and keep at least a 0.5-inch (13 mm) bond width on every overlap — so highway wind and rain shed off the edges instead of lifting them.
The installer sign-off checklist
Before a vehicle leaves, run the master sign-off. A signed pre-inspection form documents OEM vs. repainted panels, paint chips and lot numbers. The three-pass decontamination is complete. Zero open utility blades touched painted bodywork. Stretch stayed within the 104°F–140°F application window. Stretched areas were post-heated to 195°F–212°F and IR-verified. The vehicle set indoors for 12–24 hours. And every ADAS sensor and camera passed a functional test. Check every box and the wrap will outlast the promise.
Ready to wrap?
Get a free, no-obligation quote for your vehicle — color change, fleet graphics or paint protection.